
Setting Up a Softphone App
Click2Call recommends the Basic Edition app (by Voice Services) for iPhone and Android, Secure VoIP Micro Edition for Windows, and the Telephone App for Mac. All are free. On iPhone and Android, setup is a QR code scan from the portal, with no username or password to type. Select your platform below to get started. On a computer you can also skip the download and use the Web Phone in your browser.
Last reviewed: November 2026
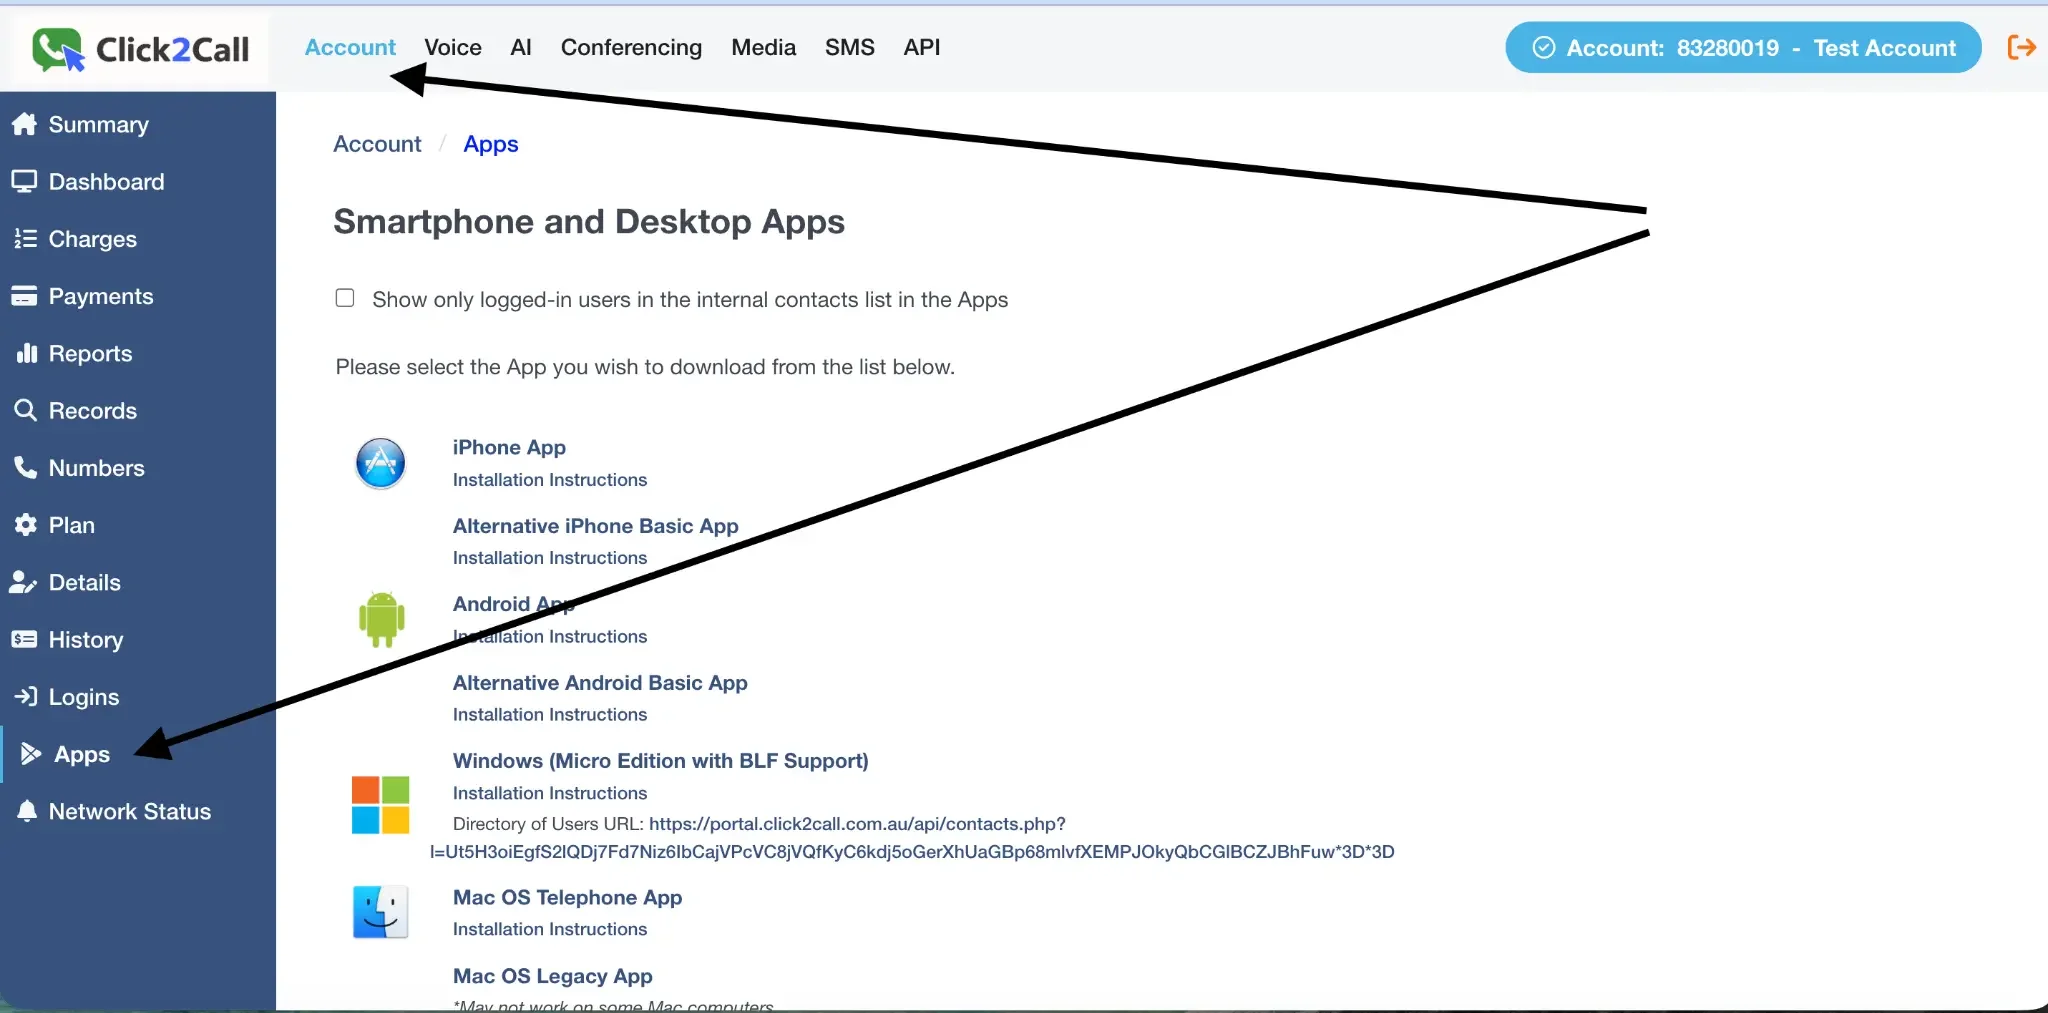
To find your app download links, log in to the portal, click the Account tab, and select Apps from the left-hand menu. From here you can download the app for your device and access the installation instructions for each platform.
Your Click2Call login details
On iPhone and Android you scan a QR code instead (see the steps below), so you only need these details on Windows or Mac, or if the QR code can’t be scanned.
You will need the following details to log in to any of the apps below. Your phone number and password are in the Click2Call portal under Voice → Line Manager. Use the number exactly as displayed there. New numbers have no password by default: type any password into the Password box on the number’s row and click Save Changes, then use that password in the app.
| Field | Value |
|---|---|
| Username / Phone Number | Your Click2Call phone number exactly as shown in the portal under Voice → Line Manager (e.g. 61370500989 — no + and no leading 0) |
| Password | The password saved in the Password box on that number’s row in Voice → Line Manager. New numbers have no password by default — type any password into the box and click Save Changes; the eye icon under the Password heading shows or hides it |
| SIP Domain (Mac only) | sip.click2call.com.au |
Setting Up Basic Edition on iPhone or iPad
App: Basic Edition by Voice Services — Download from the App Store
Download the Basic Edition app
On your iPhone or iPad, open the App Store and search for Basic Edition by Voice Services, or tap the link above. Install the app and open it.
Allow permissions
When the app opens for the first time, you will be prompted to allow access to notifications, photo library, camera, and contacts. Select Allow for each of these. Granting all permissions is important to ensure all features of the app work correctly.
Scan the QR code from the portal
In the portal, go to Voice → Line Manager and open your number’s line page. Scan the QR code shown there with the app. The app sets itself up with your number, with no username or password to type. If you can’t scan it, log in with your number and password from the table above instead.
Allow microphone access
On the main dialler screen, tap the button in the bottom right corner with the three dots. In the pop-up that follows, tap the button with the phone icon on the left. This will place a test call to your voicemail to simulate a phone call. When prompted, select Allow for microphone access. All permissions are now granted and the app is ready to use.
What to do next
The app is working. Here’s what most people do next.
Make your first call
Test a call in and out on your new number
Keep your existing number
Bring it across for $100 inc GST. It keeps working until it moves.
Add your team
$25 a user a month ex GST, each with their own number and 300 outbound minutes
Have us set it up
Managed setup from $300 ex GST for up to 3 users, done in 1–2 business days
Basic apps and the contacts list
- Basic apps. Account → Apps also lists an Alternative iPhone Basic App and an Alternative Android Basic App. Try one if the main app does not suit your phone; you log in with the same number and password.
- Mac. The Telephone app is recommended. A legacy Mac app is also listed, but may not work on some Macs.
- Show only logged-in users. Under App Settings on the same page, tick this to hide colleagues who are not logged in from the contacts list inside the apps.
To see whether there is a wider problem before troubleshooting an app, see Network Status.
Using the apps from overseas
The apps work anywhere with an internet connection, so staff working overseas, for example a remote team in the Philippines, can make and receive calls on their extension as if they were in Australia.
- Caller ID: outbound calls show the number you choose, such as your Australian business number. See Setting Outbound Caller ID.
- Charges: calls are charged by the number dialled, at the same rates as from Australia. There are no location restrictions and no extra charge for using the apps overseas.
- Internet: a call uses about 100 kbps. A stable connection matters more than a fast one; see Call Quality.
Related Guides
Still need help?
Email our Australian support team with your account number and what you’re seeing.